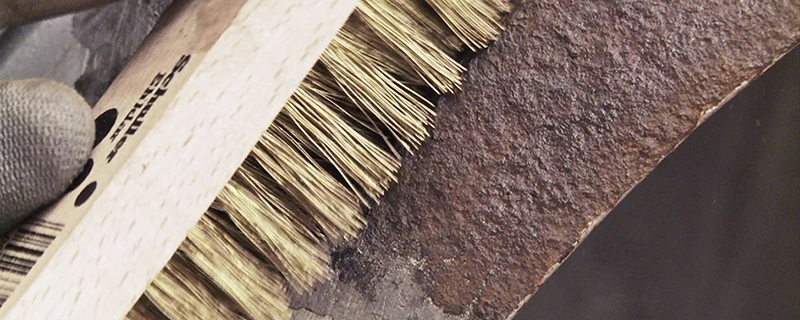
Completely remove all rust with wire brush, rust disc, and sandpaper. All rust must be removed!
3
Prime & Sand
Apply 2K epoxy primer in 2-3 coats. After 12h, wet sand with P800. Apply stone chip protection on lower areas.
4
Base Coat
Shake spray can 2 minutes. Apply multiple thin coats from 30cm distance. First coat thin (adhesion), second coat full coverage.
5
Clear Coat
After 30 minutes, apply 2K clear coat in 2-3 thin layers for UV protection and gloss.
6
Polish & Reassemble
After curing, polish blending area. Reassemble all parts – done!
▶️ Why DIY?
You don’t need to be a pro! Watch our video and you’ll see – you can do this too. Save €1800!
https://staging.mountaingolf.eu/wp-content/uploads/2022/02/Rost-am-Kotflügel-und-Einstieg-vorne-unten.jpeg7201280AutoTomTurbohttps://staging.mountaingolf.eu/wp-content/uploads/2024/03/logo_2017_340x156.pngAutoTomTurbo2026-01-22 14:40:112026-01-22 14:40:11The Classic: Rust on Fender and Door Sill
The classic: rust on fender and front entry – how to repair it.
https://staging.mountaingolf.eu/wp-content/uploads/2022/02/Rost-am-Kotflügel-und-Einstieg-vorne-unten.jpeg7201280https://staging.mountaingolf.eu/wp-content/uploads/2024/03/logo_2017_340x156.png2022-02-28 12:00:002026-03-15 11:43:48The Classic: Rust on Fender and Entry
Eye-catching, perforated, large-scale rusted body. Nobody wants to drive it anymore, but nobody wants to throw it away either because the car is technically still in good shape.
⚠️ Warning
Rust holes on load-bearing parts such as sills, underbody struts and longitudinal members must never be filled with filler. These damages must be welded by a professional.
Here’s How:
1
Remove Rust
Get rid of the rust and repair the body yourself.
Completely remove rust, protruding loose metal parts and flaking paint layers. Wrap dry sandpaper – coarse grit P60 – around a sanding block and sand the rusted areas down to bare metal over a large area.
Not a bit of rust must remain visible on the car. Where there was rust before, it must now shine brightly!
Then clean the area very thoroughly with silicone remover.
▶️ Pro Tip
It’s easier and faster with a grinder or cordless drill with attachment. This works great, is more fun and saves enormous time. Three minutes with the grinder saves 20 minutes of tedious manual work. Protect all parts that should not be sanded with masking tape.
2
Filling
Fiber filler can now be applied to the shiny, perfectly sanded and silicone remover-cleaned area.
Fiber filler (filler with polyester fibers) adheres superbly to metal and is stable on its own due to the fine fibers.
Here’s how: Spread fiber filler on a piece of cardboard and add hardener. The correct dosage is important. If you use too much hardener, the filler sets too quickly and can no longer be worked, if you use too little, it won’t cure. Max shows you how to do it right in the video.
Apply the filler generously over the perforated area.
3
Sanding
After 30 minutes the filler has cured and you can sand off the excess filler dry with coarse sandpaper, restoring the original shape of the body.
Protect everything that shouldn’t be primed and painted from overspray again!
Simply use masking paper and masking tape (see video).
4
Fine Work
After everything is sanded flat, level any remaining craters and sanding marks with filler or spray filler.
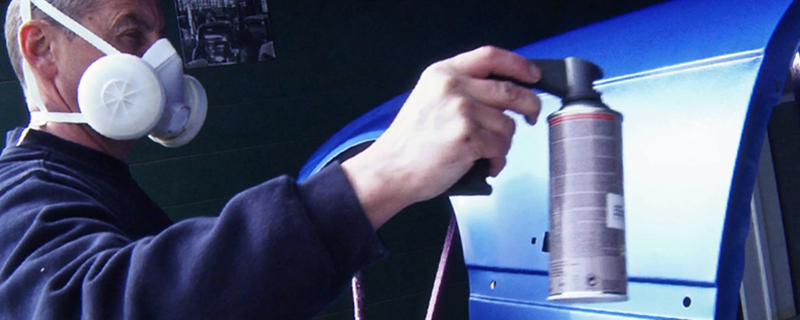
Shake the spray can long and vigorously until the components in the can are well mixed (about 5 min). The small ball in the can must move easily and freely.
Attach the handle to the can. It works like a spray gun and makes the work much easier.
⚠️ Warning
Primer, filler and paints are harmless according to manufacturers, but certainly not meant for the lungs – so always wear a protective mask!
5
Priming
Now spray the filler in several thin coats (3-5). Let it flash off for 2-3 minutes between spray passes.
The ideal spray distance is 30 cm, the ideal temperature 15 to 20 degrees.
30 minutes after the last spray pass, the filler has cured and the excess can be sanded off with wet sandpaper (P500), sponge and a bucket of water (see video).
Careful work is very important here, all unevenness must be sanded flat.
Feel is important! Don’t sand through to filler or metal, otherwise these areas need to be primed again.
6
Painting
Once the primer is applied, dry (after about 20 min) and sanded, it’s finally time for paint on the metal!
Shake the paint spray vigorously for 5 minutes until the ball is audibly hitting and everything is well mixed. Attach the handle and apply several thin coats.
The ideal spray distance is 30 cm, the ideal temperature 15 to 20 degrees.
Caution! Don’t spray too much at once, otherwise you’ll get runs… In the video, Max shows step by step how to do it right.
7
Clear Coat – Top Coat
After about 30 min. drying time, the clear coat goes over the paint layer.
Shake the clear coat well too and apply in several thin coats (should be at least 5), letting it flash off after each spray pass.
The clear coat protects the metallic particles from oxidation, gives the paint gloss, and is absolutely necessary as a protective layer.
Caution! With solid colors, no clear coat is required. If unsure, email info@dasauto.at or call the hotline.
8
Almost Done
From the outside, your car is now back in top shape, but on the inside of the bare-sanded areas, the metal is now susceptible to new rust.
Therefore, you must absolutely preserve this area.
Very good results are achieved with cavity wax. Cavity wax is the simple, ideal solution for preservation and cavity protection.
After about 1 hour of drying time, the clear coat is hard enough to remove the masking paper.
…and – Voila! The result speaks for itself!
9
Done?
If you now find small edges or transitions in the paint, that’s no problem: After 2 to 3 days the clear coat is completely cured and the edge is simply carefully removed with P2000 wet sandpaper and then polished to a high gloss.
Of course, you’ll now polish the entire car and preserve it with hard wax.
▶️ Important
Rust always spreads underneath the paint. Remove more than you see – rust must be 100% gone!
https://staging.mountaingolf.eu/wp-content/uploads/2016/10/x_Rost_1.jpg320800AutoTomTurbohttps://staging.mountaingolf.eu/wp-content/uploads/2024/03/logo_2017_340x156.pngAutoTomTurbo2018-12-06 19:24:562026-02-03 14:15:05Repair Rust and Rust Holes on Your Car
Repair minor damage yourself – from preparation to finish
▶️ Difficulty Medium
⏱️ Time 3-5 Hours
▶️ Cost €80-150
▶️ Savings €400-800 vs. Body Shop
▶️ Tools Sanding Block
Video Tutorial
▶️ Matching Product for This Video
[dasauto_product id=”368833″]
The Problem
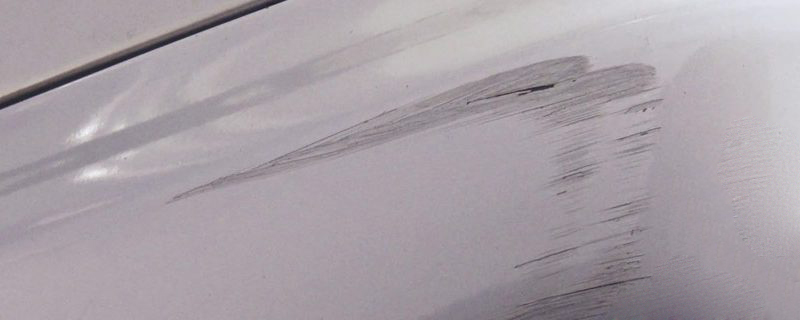
Small dents, scratches and bumps from parking mishaps or minor accidents are annoying and lower the value of your car. A body shop often charges €500 or more for such small repairs.
With the right materials and a little patience, you can repair these damages yourself and save a lot of money!
Here’s How:
1
Assessment
First assess the damage. Is it just a scratch in the clear coat, or has the paint been damaged down to the metal? For deep scratches down to the metal, rust protection is essential.
2
Preparation
Clean the damaged area thoroughly with silicone remover. Sand the area around the damage with P320-P400 sandpaper to create adhesion for the filler.
3
Filling
For dents: Apply filler in thin layers. Mix the filler with hardener according to instructions – not too much hardener, otherwise it sets too quickly!
Let each layer dry and sand smooth before applying the next. Build up gradually until the surface is level.
4
Fine Sanding
Once the filler is level with the surrounding area, sand with progressively finer grits: P400, then P600, finally P800. The surface must be perfectly smooth.
▶️ Pro Tip
For paintless dent repair, heat the panel with a heat gun first – the metal becomes more flexible! This works great for small dents without paint damage.
5
Priming
Mask off the surrounding area. Apply filler/primer in 2-3 thin coats. Let it dry for 30 minutes, then sand with P600-P800 wet sandpaper.
6
Painting
Apply base coat in 2-3 thin layers. Keep 25-30cm spray distance. Let flash off 5 minutes between coats. Then apply 2K clear coat in 2-3 layers.
7
Finishing
After 24-48 hours, polish the repaired area with polishing compound to blend it with the surrounding paint. The result should be virtually invisible!
⚠️ Warning
Always work in thin layers! Thick layers of filler crack, thick layers of paint run. Patience is key to a professional result.
https://staging.mountaingolf.eu/wp-content/uploads/2017/01/x_dellen_bb.jpg320800AutoTomTurbohttps://staging.mountaingolf.eu/wp-content/uploads/2024/03/logo_2017_340x156.pngAutoTomTurbo2018-10-21 17:08:312026-02-03 14:14:27Scratches, Dents and Bumps on Your Car
Professionally repair small paint damage without complete repainting
▶️ Difficulty Medium
⏱️ Time 2-4 Hours
▶️ Cost €50-100
▶️ Savings €300-600 vs. Body Shop
Video Tutorial
▶️ Matching Product for This Video
[dasauto_product id=”368832″]
The Problem
Larger scratches, parking damage, or small dents with paint damage require more than just a touch-up pen. The damaged area must be prepared and repaired with spray paint.
With Spot Repair, only the damaged area is painted – not the entire part. This saves time and money!
Here’s How:
1
Preparation
Thoroughly clean the damaged area with silicone remover. Remove loose paint and sand the edges with 800 grit sandpaper.
2
Priming
For areas down to bare metal: First apply rust protection primer, then filler. Let it dry well and sand.
3
Masking
Generously mask off the surrounding area. Use masking film and painter’s tape. The transitions should be able to blend softly.
4
Spraying Base Coat
Apply the base coat in 2-3 thin layers. Let it flash off for 5-10 minutes between coats. Spray distance approx. 20-25 cm.
⚠️ Warning
Don’t apply too thick! Better multiple thin coats than risking runs. With metallic paints, pay attention to consistent spray distance!
▶️ Pro Tip
Work in a dust-free environment at 15-25°C temperature. Avoid direct sunlight! Best to work in the garage with the door open.
5
Applying Clear Coat
After 20-30 minutes of flash-off time, apply 2K clear coat in 2-3 layers. The clear coat provides gloss and protection.
6
Finishing
After 24h drying time, you can polish out any dust inclusions with 2000 grit sandpaper (wet) and polishing compound.
Das Problem: Teile wie Kotflügel, Stoßstangen, Spiegel, Türen, sowie Spoiler, Verbreiterungen, Felgen etc., die ersetzt oder angebaut werden, schauen nur dann gut aus, wenn sie zum Auto passend lackiert werden. Das geht auch ohne Profi-Lackierpistole ganz einfach mit dasAuto Lacksprays.
Schwierigkeit:
einfach;
Zeitaufwand:
2h;
Kosten:
70€;
Ersparnis:
300€;
Zusätzliches Werkzeug:
Keines;
– SET für Sie:Film Set Ganzlackierung
Matter stumpfer Lack am Heckspoiler
Das Problem: Teile wie Kotflügel, Stoßstangen, Spiegel, Türen, sowie Spoiler, Verbreiterungen, Felgen etc., an denen der Lack bereits abgestumpft ist und nicht mehr Aufpoliert werden kann, werden mit einer Neulackierung mit dasAuto Lacksprays wieder zu neuem Glanz erweckt.
Schwierigkeit:
mittel;
Zeitaufwand:
3h;
Kosten:
70€;
Ersparnis:
300€;
Zusätzliches Werkzeug:
Keines;
– SET für Sie:2K Reparaturset
Und so geht`s:
Vorbereitung
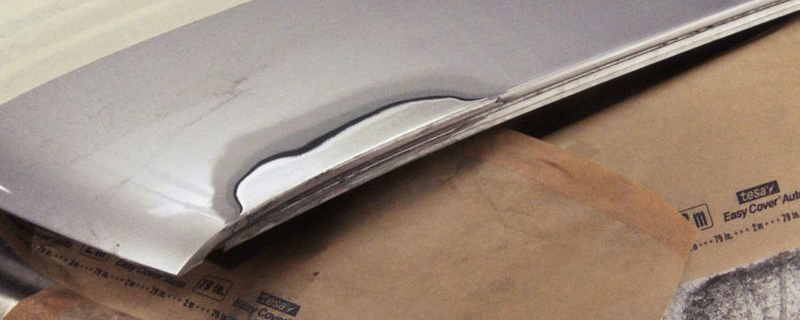
Das neue Blechteil muss auf Passform genau geprüft werden, eventuelle Verarbeitungsfehler, Lager- bzw. Frachtschäden ausrichten und anpassen.
Das alte Blechteil mit stumpfen Lack muss am Rande gründlich abgeklebt werden, damit beim Schleifen und Lackieren die benachbarten Bereiche nicht beschädigt werden.
Profi Tipp:Staub- und Insektenfreie Umgebung schaffen. Wenn Sie in der Garage arbeiten, sollte der Boden nass sein, um so Staub zu vermeiden.
Wenn Sie im Freien lackieren, sollte es unbedingt windstill sein, je früher am Morgen, desto weniger Insekten, die sich auf die frisch lackierte Fläche setzen.
Sollte es dennoch passieren, das Insekt mit Pinzette entfernen solange der Lack noch nass ist. Der Lack spannt sich aus und korrigiert den Fehler ganz von selbst.
Schleifen, Grundieren und wieder Schleifen
Die Schutzgrundierung, die vom Hersteller als Rostschutz während der Lagerung und des Transports meist sehr unregelmäßig aufgetragen wurde, muss gründlich angeschliffen werden.
Ebenso muss der alte stumpfe Lack gründlich angeschliffen werden.
Auf die geschliffene und mit Silikonentferner gereinigte Fläche Grundfüller in zwei dünnen Schichten deckend lackieren.
Zwischen den Spritzgängen fünf Minuten ablüften lassen. Nach 20 Minuten ist das Teil trocken und kann jetzt geschliffen werden.
Mit Wasserschleifpapier Körnung P600 oder feiner die Grundierung schleifen.
Lackieren Ist der Grundfüller aufgetragen, trocken (nach ca. 20 min) und geschliffen, kommt mit dem Lackspray endlich Farbe ins Spiel!
Den Lackspray 5 Minuten kräftig schütteln, bis die Kugel hörbar anschlägt und alles gut vermischt ist. Handgriff aufstecken erste dünne Lackschicht (Klebeschicht) aufsprühen und 3 Minuten ablüften lassen.
Dann in weiteren feinen Schichten den Lack auftragen bis Sie eine schöne gleichmäßig deckende Lackfarbe haben. Immer jeweils 3 Minuten Lüftzeit zwischen den Schichten beachten.
Der ideale Spritzabstand beträgt 30 cm, die Idealtemperatur 15 bis 20 Grad.
Achtung! Nicht zuviel auf einmal aufsprühen, sonst gibt es Tränenbildung des ablaufenden Lackes… Im Film zeigt Max Schritt für Schritt, wie’s richtig gemacht wird.
Klarlack – Decklack Nach ca. 30 min. Trocknungszeit kommt der Klarlack über die Lackschicht.
Auch den Klarlack wieder gut schütteln und in 3-5 Schichten dünn auftragen und nach jedem Spritzgang ablüften lassen.
Der Klarlack schützt die Metallic-Teilchen vor Oxidation, er lässt den Lack glänzen und ist als Schutzschicht unbedingt notwendig.
Achtung! Bei Unilacken ist kein Klarlack erforderlich. Bei Unsicherheit entweder e-mail an info@staging.mountaingolf.eu oder die Hotline anrufen (+49 8505 919 333 während der Geschäftszeiten).
Fertig ? Sollten Sie jetzt noch irgendwo kleine Kanten, Übergänge oder Tränen im Lack finden, dann ist das auch kein Problem: Nach 2 bis 3 Tagen ist der Klarlack komplett ausgehärtet und die Kante wird einfach mit Wasserschleifpapier P2000 sehr vorsichtig abgenommen und anschließend auf Hochglanz poliert.
Natürlich werden Sie jetzt das ganze Auto polieren und mit Hartwachs konservieren. Hochglanz und Hochstimmung! Gratulation!
https://staging.mountaingolf.eu/wp-content/uploads/2016/10/x_Lack_Blech_bb.jpg320800admin2https://staging.mountaingolf.eu/wp-content/uploads/2024/03/logo_2017_340x156.pngadmin22017-02-26 12:00:002026-03-17 15:15:46Blechteile mit Lackspray lackieren
Paint sheet metal parts with spray paint for perfect results.
https://staging.mountaingolf.eu/wp-content/uploads/2017/01/x_dellen_bb.jpg320800https://staging.mountaingolf.eu/wp-content/uploads/2024/03/logo_2017_340x156.png2017-02-26 12:00:002026-03-15 11:43:48Sheet Metal Parts with Spray Paint
Das Problem: Teile wie Kotflügel, Stoßstangen, Spiegel, Spoiler, Verbreiterungen aus Kunststoff, die ersetzt oder angebaut werden, schauen nur dann gut aus, wenn sie zum Auto passend lackiert werden. Das geht auch ohne Profi-Lackierpistole ganz einfach mit dasAuto Lacksprays.
Schwierigkeit:
leicht;
Zeitaufwand:
3h;
Kosten:
150€;
Ersparnis:
500€;
Zusätzliches Werkzeug:
Keine;
– SET für Sie:Film – SET Frontspoiler Ganzlackierung
Und so geht`s:
Vorbereitung
Das Kunststoffteil muss auf Passform genau geprüft werden, eventuelle Verarbeitungsfehler, Lager- bzw. Frachtschäden beheben und anpassen.
Kunststoffteile, die vom Hersteller nicht grundiert wurden, sorgfältig mit Wasserschleifpapier P800 anschleifen und vor allem sehr gründlich mit Silikonentferner reinigen. Die Hersteller verwenden spezielle Lösungsmittel, damit sich die Kunststoffteile besser aus der Gussform lösen lassen. Diese Lösungsmittel vertragen sich gar nicht mit Grundierung, Kitt und Lack. Sorgfältiges Reinigen verhindert spätere Probleme.
Profi Tipp:Staub- und Insektenfreie Umgebung schaffen. Wenn Sie in der Garage arbeiten, sollte der Boden nass sein, um so Staub zu vermeiden.
Wenn Sie im Freien lackieren, sollte es unbedingt windstill sein, je früher am Morgen, desto weniger Insekten, die sich auf die frisch lackierte Fläche setzen.
Sollte es dennoch passieren, das Insekt mit Pinzette entfernen solange der Lack noch nass ist. Der Lack spannt sich aus und korrigiert den Fehler ganz von selbst.
Grundieren und wieder Schleifen
Auf das geschliffene und gereinigte Kunststoffteil zwei Schichten Plastikprimer auftragen und ablüften lassen.
Nach 20 Minuten Trocknungszeit ist Kunststoffteil – je nach Zustand – bereit für Kitt und Füller oder die Endlackierung.
Nehmen Sie sich Zeit, je gründlicher Sie schleifen, umso besser das Ergebnis.
Profi Tipp:Um beim Schleifen keine Stellen zu übersehen, verwenden Profis Kontrolllack. So erkennt man, sofort, wo bereits geschliffen wurde und wo noch nicht.
Lackieren Ist der Grundfüller aufgetragen, trocken (nach ca. 20 min) und geschliffen, kommt mit dem Lackspray endlich Farbe ins Spiel!
Den Lackspray 5 Minuten kräftig schütteln, bis die Kugel hörbar anschlägt und alles gut vermischt ist. Handgriff aufstecken erste dünne Lackschicht (Klebeschicht) aufsprühen und 3 Minuten ablüften lassen.
Dann in weiteren feinen Schichten den Lack auftragen bis Sie eine schöne gleichmäßig deckende Lackfarbe haben. Immer jeweils 3 Minuten Lüftzeit zwischen den Schichten beachten.
Der ideale Spritzabstand beträgt 30 cm, die Idealtemperatur 15 bis 20 Grad.
Achtung! Nicht zuviel auf einmal aufsprühen, sonst gibt es Tränenbildung des ablaufenden Lackes… Im Film zeigt Max Schritt für Schritt, wie’s richtig gemacht wird.
Klarlack – Decklack Nach ca. 30 min. Trocknungszeit kommt der Klarlack über die Lackschicht.
Auch den Klarlack wieder gut schütteln und in 3-5 Schichten dünn auftragen und nach jedem Spritzgang ablüften lassen.
Der Klarlack schützt die Metallic-Teilchen vor Oxidation, er lässt den Lack glänzen und ist als Schutzschicht unbedingt notwendig.
Achtung! Bei Unilacken ist kein Klarlack erforderlich. Bei Unsicherheit entweder e-mail an max@dasauto.at oder die Hotline anrufen (+49 8505 919 333 während der Geschäftszeiten).
Fertig ? Sollten Sie jetzt noch irgendwo kleine Kanten, Übergänge oder Tränen im Lack finden, dann ist das auch kein Problem: Nach 2 bis 3 Tagen ist der Klarlack komplett ausgehärtet und die Kante wird einfach mit Wasserschleifpapier P2000 sehr vorsichtig abgenommen und anschließend auf Hochglanz poliert.
Natürlich werden Sie jetzt das ganze Auto polieren und mit Hartwachs konservieren. Hochglanz und Hochstimmung! Gratulation!
https://staging.mountaingolf.eu/wp-content/uploads/2017/02/x_Lack_Kunstst_3.jpg472945admin2https://staging.mountaingolf.eu/wp-content/uploads/2024/03/logo_2017_340x156.pngadmin22017-02-25 12:00:002026-03-17 15:28:34Kunststoffteile mit Lackspray lackieren
https://staging.mountaingolf.eu/wp-content/uploads/2017/01/x_geschliffen_bb.jpg320800https://staging.mountaingolf.eu/wp-content/uploads/2024/03/logo_2017_340x156.png2017-02-25 12:00:002026-03-15 11:43:48Plastic Parts with Spray Paint
Learn how to repair rust and rust holes on your car with our step-by-step guide.
https://staging.mountaingolf.eu/wp-content/uploads/2016/10/x_Rost_1.jpg320800https://staging.mountaingolf.eu/wp-content/uploads/2024/03/logo_2017_340x156.png2017-02-24 12:00:002026-03-15 11:43:48Repair Rust and Rust Holes on Your Car

 Blechteile mit Lackspray lackieren