#02: Repair previous damage 1

#02: Repair previous damage 1

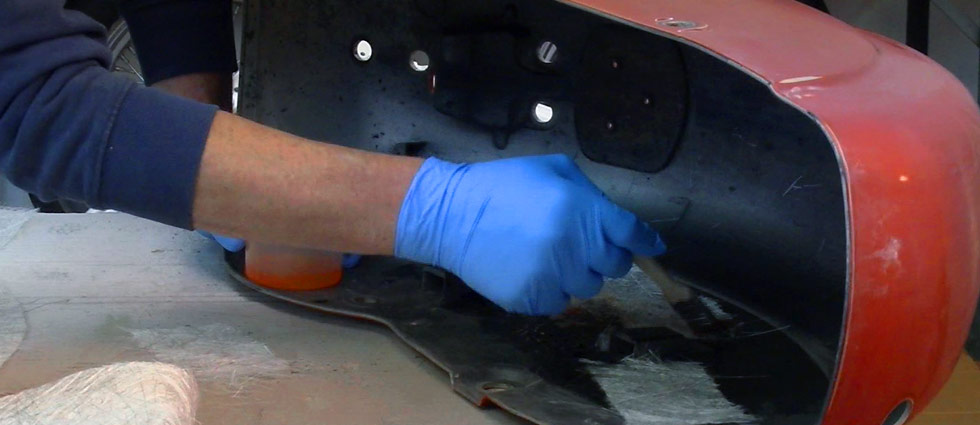
Dents, scratches, and rust—the damage is assessed and repaired.


EPISODE
2 of 12

DIFFICULTY
Medium

TIME REQUIRED
1-2 days

Video Tutorial

Recommended SET

Filler & Sanding SET

Go to Shop →

Work Steps:

1

Inventory

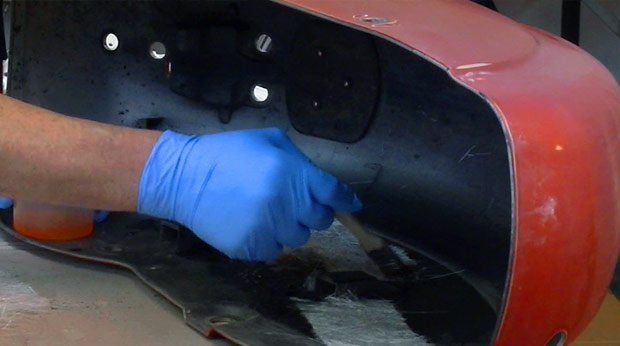
Carefully inspect all parts and document any damage. Which parts can be repaired and which need to be replaced?
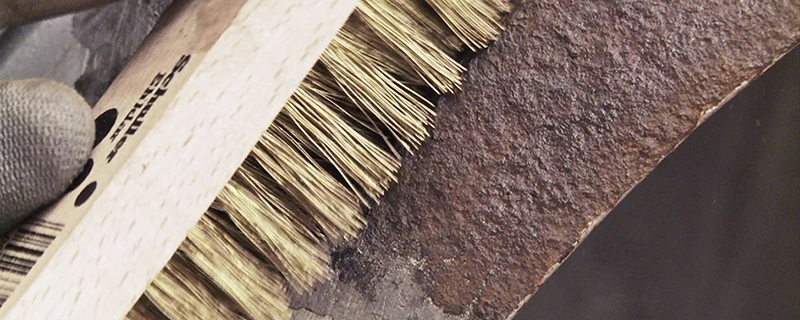
2

Treat rust

Rust deposits are removed with a wire brush and sandpaper. Rust converter stops corrosion.
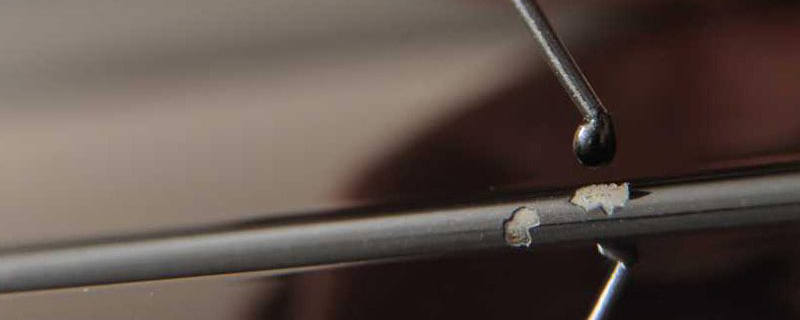
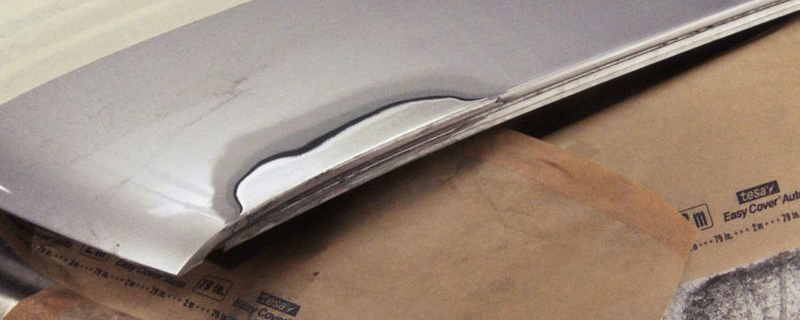
3

Push out dents

Smaller dents are carefully pressed out or filled with tin/filler.
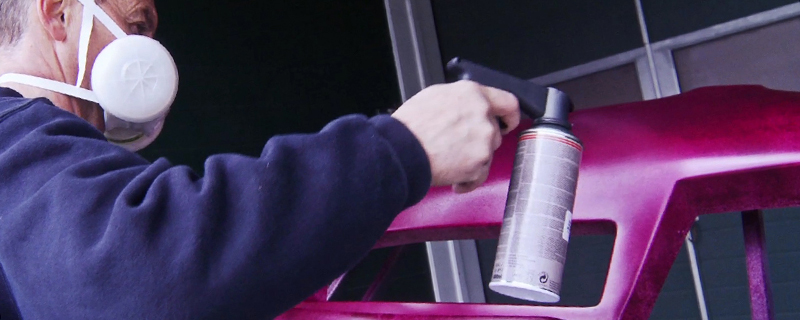
4

Apply filler

Use a fine filler to level out any unevenness. Apply thinly, allow to dry thoroughly, then sand smooth.

The Challenge

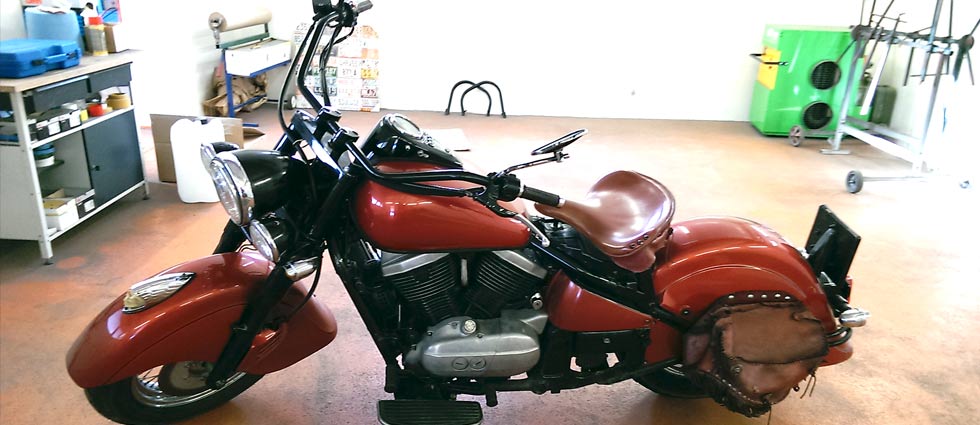
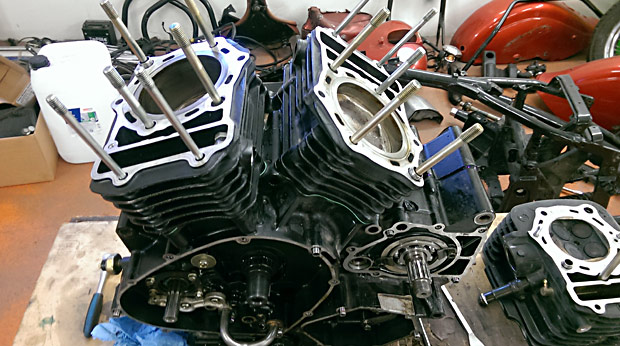
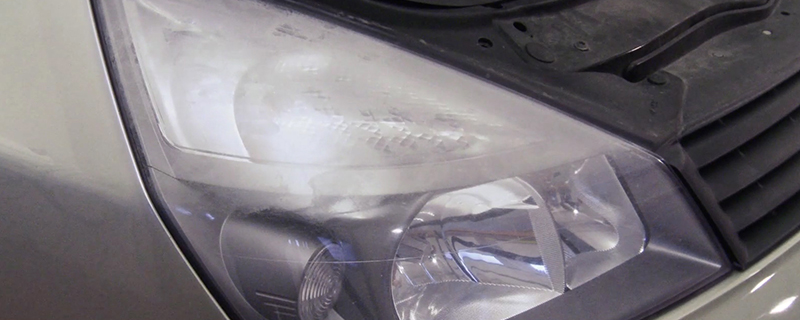
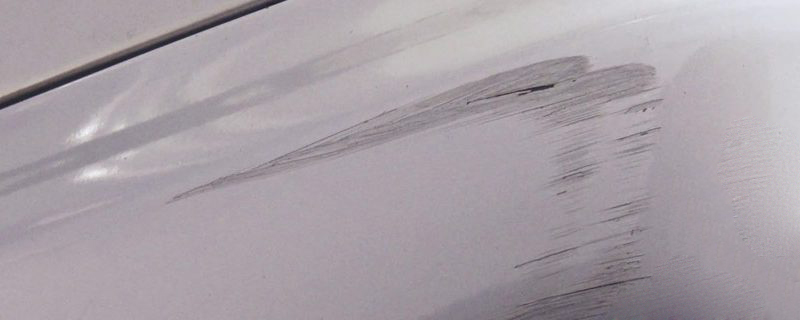
After dismantling, the true extent of the damage becomes apparent: dents in the tank, scratches on the side covers, rust spots on the frame.

Now it’s time for a thorough damage assessment and systematic repair of all previous damage.

Pro Tip

It is preferable to apply several thin layers of filler rather than one thick layer! Always allow each layer to dry thoroughly and sand between coats.

#01: Disassemble completely

▶️️ #01: Disassemble completely

The beginning of a big project – the Kawasaki Drifter is completely disassembled

▶️
Episode
1 of 12
▶️
Difficulty
Medium
⏱️
Time Required
1-2 days

Video Tutorial

▶️ Recommended SET

Complete Paint Set for Motorcycles

Go to Shop →

Work Steps:

1

Documentation

Before disassembly: Take photos! Photograph every screw, every cable, every connection. This helps enormously later during reassembly.

3

Electrics

Disconnect the battery, then systematically disconnect all electrical connections. Mark the plugs!

4

Engine & Gearbox

The engine is removed and stored separately. Drain the oil first!

The Project

The Kawasaki VN800 Drifter – a real gem in Indian style. After many years on the road, it needs a complete restoration.

In this episode the big adventure begins: Everything has to come off! Tank, fairings, engine, wheels – piece by piece the machine is disassembled.

2

Tank & Fairings

First, the tank and all fairing parts come off. Store screws and small parts in labeled bags.

Pro Tip

Use magnetic screw trays and label everything! A smartphone video of the disassembly can be worth gold during reassembly.

Repair Rust and Rust Holes on Your Car

▶️ Repair Rust and Rust Holes on Your Car

Professionally treat rusted areas, fill and paint

▶️
Difficulty
Challenging
⏱️
Time
5-8 Hours
▶️
Cost
€200
▶️
Savings
€1000
▶️
Tools
Grinder, Hand Tools

Video Tutorial Step by Step

▶️ Matching Product for This Video

[dasauto_product id=”368831″]

The Problem

Eye-catching, perforated, large-scale rusted body. Nobody wants to drive it anymore, but nobody wants to throw it away either because the car is technically still in good shape.

⚠️ Warning

Rust holes on load-bearing parts such as sills, underbody struts and longitudinal members must never be filled with filler. These damages must be welded by a professional.

Here’s How:

1

Remove Rust

Get rid of the rust and repair the body yourself.

Completely remove rust, protruding loose metal parts and flaking paint layers. Wrap dry sandpaper – coarse grit P60 – around a sanding block and sand the rusted areas down to bare metal over a large area.

Not a bit of rust must remain visible on the car. Where there was rust before, it must now shine brightly!

Then clean the area very thoroughly with silicone remover.

▶️ Pro Tip

It’s easier and faster with a grinder or cordless drill with attachment. This works great, is more fun and saves enormous time. Three minutes with the grinder saves 20 minutes of tedious manual work. Protect all parts that should not be sanded with masking tape.

2

Filling

Fiber filler can now be applied to the shiny, perfectly sanded and silicone remover-cleaned area.

Fiber filler (filler with polyester fibers) adheres superbly to metal and is stable on its own due to the fine fibers.

Here’s how: Spread fiber filler on a piece of cardboard and add hardener. The correct dosage is important. If you use too much hardener, the filler sets too quickly and can no longer be worked, if you use too little, it won’t cure. Max shows you how to do it right in the video.

Apply the filler generously over the perforated area.

3

Sanding

After 30 minutes the filler has cured and you can sand off the excess filler dry with coarse sandpaper, restoring the original shape of the body.

Protect everything that shouldn’t be primed and painted from overspray again!

Simply use masking paper and masking tape (see video).

4

Fine Work

After everything is sanded flat, level any remaining craters and sanding marks with filler or spray filler.

Shake the spray can long and vigorously until the components in the can are well mixed (about 5 min). The small ball in the can must move easily and freely.

Attach the handle to the can. It works like a spray gun and makes the work much easier.

⚠️ Warning

Primer, filler and paints are harmless according to manufacturers, but certainly not meant for the lungs – so always wear a protective mask!

5

Priming

Now spray the filler in several thin coats (3-5). Let it flash off for 2-3 minutes between spray passes.

The ideal spray distance is 30 cm, the ideal temperature 15 to 20 degrees.

30 minutes after the last spray pass, the filler has cured and the excess can be sanded off with wet sandpaper (P500), sponge and a bucket of water (see video).

Careful work is very important here, all unevenness must be sanded flat.

Feel is important! Don’t sand through to filler or metal, otherwise these areas need to be primed again.

6

Painting

Once the primer is applied, dry (after about 20 min) and sanded, it’s finally time for paint on the metal!

Shake the paint spray vigorously for 5 minutes until the ball is audibly hitting and everything is well mixed. Attach the handle and apply several thin coats.

The ideal spray distance is 30 cm, the ideal temperature 15 to 20 degrees.

Caution! Don’t spray too much at once, otherwise you’ll get runs… In the video, Max shows step by step how to do it right.

7

Clear Coat – Top Coat

After about 30 min. drying time, the clear coat goes over the paint layer.

Shake the clear coat well too and apply in several thin coats (should be at least 5), letting it flash off after each spray pass.

The clear coat protects the metallic particles from oxidation, gives the paint gloss, and is absolutely necessary as a protective layer.

Caution! With solid colors, no clear coat is required. If unsure, email info@dasauto.at or call the hotline.

8

Almost Done

From the outside, your car is now back in top shape, but on the inside of the bare-sanded areas, the metal is now susceptible to new rust.

Therefore, you must absolutely preserve this area.

Very good results are achieved with cavity wax. Cavity wax is the simple, ideal solution for preservation and cavity protection.

After about 1 hour of drying time, the clear coat is hard enough to remove the masking paper.

…and – Voila! The result speaks for itself!

9

Done?

If you now find small edges or transitions in the paint, that’s no problem: After 2 to 3 days the clear coat is completely cured and the edge is simply carefully removed with P2000 wet sandpaper and then polished to a high gloss.

Of course, you’ll now polish the entire car and preserve it with hard wax.

▶️ Important

Rust always spreads underneath the paint. Remove more than you see – rust must be 100% gone!

Need supplies?

Shop Now →

Polishing and Waxing with Machine

✨ Polishing and Waxing with a Polisher

Restore shine and protect your paint

▶️
Difficulty
Easy-Medium
⏱️
Time
2-4 Hours
▶️
Cost
€30-80
▶️
Savings
€200-500 vs. Detailer
▶️
Tools
Polishing Machine

▶️ Video Tutorial

▶️ Matching Product for This Video

[dasauto_product id=”368402″]

Why Polish?

Over time, car paint loses its shine due to UV rays, bird droppings, tree sap, and environmental pollution. Polishing removes the damaged top layer of clear coat and reveals fresh, glossy paint underneath.

Waxing then protects this fresh surface from new damage.

Here’s How:

1

Wash Thoroughly

Start with a thorough wash. Remove all dirt, insects, and tar. The surface must be perfectly clean before polishing – any particles can cause scratches during the polishing process.

2

Clay Bar Treatment (Optional)

For heavily contaminated paint, use a clay bar to remove embedded contaminants. The paint should feel smooth as glass afterwards.

3

Polishing Compound

Apply a small amount of polishing compound to the pad. Work section by section – about 50x50cm at a time. Start with medium speed and light pressure.

Keep the polisher moving! Never stay in one spot too long.

4

Fine Polish

After the compound, switch to a softer pad and finer polish. This removes the light haze left by the compound and brings out maximum gloss.

5

Wax or Sealant

Apply wax or paint sealant with a soft applicator or machine. Let it haze, then buff off with a clean microfiber cloth. This protects your work for months.

⚠️ Warning

Don’t stay in one spot – you can burn through clear coat! Keep the machine moving at all times. Start with the least aggressive compound and pad combination.

▶️ Pro Tip

Work in the shade or garage – direct sunlight causes products to dry too fast. Temperature should be between 15-25°C for best results.

Recommended Polishing System:

Step 1: Cutting compound with firm pad – removes defects

Step 2: Fine polish with soft pad – refines finish

Step 3: Wax/sealant with foam applicator – protects

Need supplies?

Shop Now →

Repair Scratches on Car Paint

✨ Repair Scratches on Car Paint

Remove scratches and restore the shine

▶️
Difficulty
Easy
⏱️
Time
30-60 min
▶️
Cost
€20-50
▶️
Savings
€200-400
▶️
Tools
Polisher/By Hand

▶️ Video Tutorial

▶️ Matching Product for This Video

[dasauto_product id=”368868″]

⚠️ The Problem

Scratches on car paint are annoying and lower the value of your vehicle. But not every scratch requires expensive professional repair. Many scratches can be removed yourself with the right technique!

Types of Scratches:

Clear Coat Scratches: Only the clear coat is affected. These scratches can usually be polished out completely.

Base Coat Scratches: The color layer is damaged. Touch-up and polishing required.

Deep Scratches: Down to metal. Requires complete repair with primer, paint, and clear coat.

▶️ Quick Test

Wet the scratch – if it disappears when wet, it’s a clear coat scratch and can be polished out!

Here’s How:

1

Clean the Area

Thoroughly wash and clean the scratched area. Remove all dirt, wax, and silicone residues. Use silicone remover for best results.

2

Assess the Damage

Run your fingernail across the scratch. If it catches, the scratch is deeper. If it slides smoothly, it’s likely just a clear coat scratch.

3

Polish with Compound

Apply polishing compound to a microfiber cloth or polishing pad. Work in circular motions with moderate pressure. The compound gently removes a thin layer of clear coat, eliminating the scratch.

4

Fine Polish

After the compound, use a finer polish to restore the gloss. Work in the same way – circular motions, moderate pressure.

5

Seal and Protect

Apply wax or sealant to protect the polished area. This step is essential – the polished surface is now more vulnerable without protection.

⚠️ Warning

Don’t polish too aggressively! Each polishing session removes a small amount of clear coat. On older cars with thin clear coat, be especially careful.

▶️ Pro Tip

A machine polisher makes the job faster and easier, but requires practice. For beginners, polishing by hand is safer – it’s harder to damage the paint.

Need supplies?

Shop Now →

Paint Pen for Stone Chip Repair

▶️ Paint Pen for Stone Chip Repair

Paint pipette for repairing stone chips on your car

▶️
Difficulty
Easy
⏱️
Time
15min per Chip
▶️
Cost
€30
▶️
Savings
Preserves Car Value
▶️
Tools
Polishing Tools

▶️ Video Tutorial

▶️ Matching Product for This Video

[dasauto_product id=”368867″]

⚠️ The Problem

Stone chips – usually on bumper, grille, hood, front edge of roof; Stone impact chips off the paint and leaves a crater. The damaged, unprotected area must be sealed again, otherwise it will rust within a short time.

Paint pipette for stone chips – The method of repairing stone chips with a paint pipette was developed by dasAuto and is completely new. All previous methods for fixing typical stone chips on hood and front end don’t produce truly satisfactory results. The innovation in this area is the paint pipette.

Precise dosing is possible through the tiny opening of the pipette (0.2 mm). The paint pipette is offered in combination with the touch-up pen. dasAuto exclusively uses quality acrylic paints from Glasurit. Every color shade is mixed exactly according to the color code from the vehicle manufacturer and filled for you.

Here’s How:

1

Remove Rust

Remove the rust! All loose and protruding paint and rust particles must be scraped off and removed with a pointed object.

Thoroughly clean the damaged area with silicone remover from grease and silicone as well as paint and rust particles.

2

Apply Paint

Shake the proven touch-up pen well for two minutes, the ball must hit audibly, open the screw cap, wipe off the brush well and set aside.

Now the pipette comes into play. Squeeze the pipette at the top and dip it to the bottom of the bottle.

Release the bulb and the pipette fills with paint. The tiny opening of the pipette – 0.2 mm – allows precise dosing of the paint quantity and pinpoint repair.

Unlike the touch-up pen, the paint is not brushed, but dripped in.

The crater is thereby slightly overfilled so that the base coat distributes evenly in the stone chip. This also completely seals the cracked edges.

About a third of the filled paint quantity is solvent and evaporates. This creates space for the final clear coat.

▶️ Pro Tip

For typical stone chips that cause deep craters, the paint pipette is ideal.

The paint is not brushed, but dripped in and thus seals the crater air- and watertight.

3

Sanding and Clear Coat

Now the excess base coat that is still on the outer edge of the crater due to overfilling must be removed. For this, the included sanding block is wrapped with the matching wet sandpaper – grit P2000. With lots of water and light pressure, sand off the excess base coat in circular motions.

Without the sanding block, there’s a risk of removing the dripped paint in the crater as well.

Check the result in between.

Now drip the clear coat onto the cleaned and dry area and clearly overfill.

The clear coat must fill and seal every tiny crack.

⚠️ Warning

Be sure to allow a drying time of two days. The clear coat must be fully cured to sand well.

4

Sanding and Polishing

This protective clear coat layer, cured for at least 2 days, is again carefully taken down to a slightly raised level with lots of water, sanding block and wet sandpaper – grit P2000.

This small but important overfill ensures a 100% tight seal.

The surface made matte by sanding is now polished multiple times and brought to high gloss.

You won’t always succeed in making the paint damage completely invisible.

But this new repair method allows a first-class result. Not only optically perfect, but also absolutely air and watertight. Without oxygen, no oxidation – rusting is no longer possible.

Need supplies?

Shop Now →

Repair Foggy Headlights

▶️ Repair Foggy Headlights

Restore yellowed headlights yourself

▶️
Difficulty
Easy
⏱️
Time
2 Hours
▶️
Cost
€55
▶️
Savings
Up to €2000
▶️
Tools
Sanding Tools

▶️ Video Tutorial

▶️ Matching Product for This Video

[dasauto_product id=”368836″]

⚠️ The Problem

Stone chips, UV light, salt, insects and weather effects cloud and scratch the plastic covers on modern headlights. Poor light significantly increases the risk of accidents, harms the appearance, and the cloudy matte lens won’t pass safety inspection.

Foggy headlights – Since headlights on almost all modern vehicles are either glued or manufactured as one piece, the covers cannot be replaced. New headlights can cost a lot of money, especially with xenon and cornering lights, one headlight costs up to €1,000. Add installation and adjustment work. DasAuto Easy Repair has developed a way to repair yellowed headlights yourself, cost-effectively and without much effort, even without technical knowledge.

Here’s How:

1

Preparation

The first step is to protect the adjacent body parts with masking tape so that the paint is not damaged during sanding. All painted parts must be very carefully masked off.

2

Sanding and Cleaning

With a large sponge, lots of water and wet sandpaper – grit P800 – the yellowed and cloudy protective layer is sanded off. This is very easy and quick as the damaged protective layer is easily removed.

Always rinse with plenty of water in between.

You get the perfectly clear cover by final fine sanding with lots of water and wet sandpaper – grit P2000. This is no magic either: With circular motion and light pressure, the entire cover must be sanded evenly.

3

Masking

Now you need to mask off. Masking is worth it because it’s much more tedious to remove paint from the fender, bumper, grille and engine bay later.

Thorough cleaning is necessary to remove grease and silicone as well as sanding particles.

A lint-free cloth and a cleaner specially developed for plastic allow a residue-free surface.

4

Priming

For the clear coat applied later to remain robust and durable, the cover must be primed with plastic primer.

This primer is important because it creates a stable bond for the clear coat on the plastic.

A thin layer of primer is sufficient and is dry and ready for overcoating after 30 minutes.

⚠️ Warning

Shake the can vigorously for 3 min from the audible impact of the balls. This ensures optimal mixing with the hardener. Use the handle again, it makes painting easier.

▶️ Pro Tip

2K (2 component) clear coat is significantly more durable and resistant than 1K (1 component) clear coat.

Plastic primer is absolutely necessary. The primer ensures a compact and long-lasting bond between clear coat and headlight. Without primer, the clear coat will peel off and the work was in vain.

5

Painting

We recommend the 2K 2in1 Headlight Clear Coat. This special 2K clear coat was developed for the subsequent protective coating of polycarbonate lenses.

This clear coat is significantly more durable and resistant than many other products offered.

In this 2K clear coat, the hardener is integrated in a separate cartridge in the spray can. The hardener is released by pressing a button and mixes by shaking in the can. The 2-component system is particularly robust and resistant to scratches and weather influences and guarantees the highest product quality.

Spray the first thin coat with even movements and let it dry for four to five minutes. Finally, apply a second generous coat for full coverage.

▶️ New Product

The headlight clear coat has been further developed by the manufacturer and combined with a plastic primer. Primer & clear coat are now applied in one spray pass. No more plastic primer needed!

⚠️ Warning

Don’t apply too thick, otherwise the paint will run and form ugly drips.

6

Done

The headlights are like new and pass every safety inspection. Perfect light, perfect appearance, repaired yourself and saved a lot of money in the process.

Need supplies?

Shop Now →

Scratches, Dents and Bumps on Your Car

▶️ Scratches, Dents and Bumps on Your Car

Repair minor damage yourself – from preparation to finish

▶️
Difficulty
Medium
⏱️
Time
3-5 Hours
▶️
Cost
€80-150
▶️
Savings
€400-800 vs. Body Shop
▶️
Tools
Sanding Block

Video Tutorial

▶️ Matching Product for This Video

[dasauto_product id=”368833″]

The Problem

Small dents, scratches and bumps from parking mishaps or minor accidents are annoying and lower the value of your car. A body shop often charges €500 or more for such small repairs.

With the right materials and a little patience, you can repair these damages yourself and save a lot of money!

Here’s How:

1

Assessment

First assess the damage. Is it just a scratch in the clear coat, or has the paint been damaged down to the metal? For deep scratches down to the metal, rust protection is essential.

2

Preparation

Clean the damaged area thoroughly with silicone remover. Sand the area around the damage with P320-P400 sandpaper to create adhesion for the filler.

3

Filling

For dents: Apply filler in thin layers. Mix the filler with hardener according to instructions – not too much hardener, otherwise it sets too quickly!

Let each layer dry and sand smooth before applying the next. Build up gradually until the surface is level.

4

Fine Sanding

Once the filler is level with the surrounding area, sand with progressively finer grits: P400, then P600, finally P800. The surface must be perfectly smooth.

▶️ Pro Tip

For paintless dent repair, heat the panel with a heat gun first – the metal becomes more flexible! This works great for small dents without paint damage.

5

Priming

Mask off the surrounding area. Apply filler/primer in 2-3 thin coats. Let it dry for 30 minutes, then sand with P600-P800 wet sandpaper.

6

Painting

Apply base coat in 2-3 thin layers. Keep 25-30cm spray distance. Let flash off 5 minutes between coats. Then apply 2K clear coat in 2-3 layers.

7

Finishing

After 24-48 hours, polish the repaired area with polishing compound to blend it with the surrounding paint. The result should be virtually invisible!

⚠️ Warning

Always work in thin layers! Thick layers of filler crack, thick layers of paint run. Patience is key to a professional result.

Need supplies?

Shop Now →

Spot Repair – Partial Paint Repair

▶️ Spot Repair – Partial Paint Repair

Professionally repair small paint damage without complete repainting

▶️
Difficulty
Medium
⏱️
Time
2-4 Hours
▶️
Cost
€50-100
▶️
Savings
€300-600 vs. Body Shop

Video Tutorial

▶️ Matching Product for This Video

[dasauto_product id=”368832″]

The Problem

Larger scratches, parking damage, or small dents with paint damage require more than just a touch-up pen. The damaged area must be prepared and repaired with spray paint.

With Spot Repair, only the damaged area is painted – not the entire part. This saves time and money!

Here’s How:

1

Preparation

Thoroughly clean the damaged area with silicone remover. Remove loose paint and sand the edges with 800 grit sandpaper.

2

Priming

For areas down to bare metal: First apply rust protection primer, then filler. Let it dry well and sand.

3

Masking

Generously mask off the surrounding area. Use masking film and painter’s tape. The transitions should be able to blend softly.

4

Spraying Base Coat

Apply the base coat in 2-3 thin layers. Let it flash off for 5-10 minutes between coats. Spray distance approx. 20-25 cm.

⚠️ Warning

Don’t apply too thick! Better multiple thin coats than risking runs. With metallic paints, pay attention to consistent spray distance!

▶️ Pro Tip

Work in a dust-free environment at 15-25°C temperature. Avoid direct sunlight! Best to work in the garage with the door open.

5

Applying Clear Coat

After 20-30 minutes of flash-off time, apply 2K clear coat in 2-3 layers. The clear coat provides gloss and protection.

6

Finishing

After 24h drying time, you can polish out any dust inclusions with 2000 grit sandpaper (wet) and polishing compound.

Need supplies?

Shop Now →

Paint Plastic Parts with Spray Paint

▶️ Paint Plastic Parts with Spray Paint

Bumpers, mirrors, spoilers and fender flares – paint them professionally

▶️
Difficulty
Easy
⏱️
Time
3 Hours
▶️
Cost
€150
▶️
Savings
€500
▶️
Tools
None Required

Video Tutorial – Complete Plastic Painting

▶️ Matching Product for This Video

[dasauto_product id=”368834″]

The Problem

Parts like fenders, bumpers, mirrors, spoilers, and flares made of plastic that are replaced or added only look good when they are painted to match the car.

This is also possible without a professional spray gun – simply with dasAuto paint sprays.

Here’s How:

1

Preparation

The plastic part must be checked for exact fit, any manufacturing defects, storage or transport damage must be repaired and adjusted.

Plastic parts that have not been primed by the manufacturer should be carefully sanded with P800 wet sandpaper and thoroughly cleaned with silicone remover. Manufacturers use special solvents to help plastic parts release from the mold more easily. These solvents do not mix well with primer, filler and paint. Thorough cleaning prevents later problems.

▶️ Pro Tip

Create a dust and insect-free environment. If you work in the garage, the floor should be wet to avoid dust.

If you paint outdoors, it should be completely windless. The earlier in the morning, the fewer insects that might land on the freshly painted surface.

If it does happen, remove the insect with tweezers while the paint is still wet. The paint will level out and correct the mistake on its own.

2

Priming and Re-sanding

Apply two coats of plastic primer to the sanded and cleaned plastic part and let it flash off.

After 20 minutes of drying time, the plastic part is – depending on condition – ready for filler or final painting.

Take your time – the more thoroughly you sand, the better the result.

▶️ Pro Tip

To avoid missing any spots when sanding, professionals use guide coat. This way you can immediately see where you’ve already sanded and where you haven’t.

3

Painting

Once the filler is applied, dry (after about 20 min) and sanded, it’s finally time for paint!

Shake the paint spray vigorously for 5 minutes until the ball is audibly hitting and everything is well mixed. Attach the handle, spray the first thin coat (tack coat) and let it flash off for 3 minutes.

Then apply the paint in further thin coats until you have a nice, evenly covering paint layer. Always allow 3 minutes of flash-off time between coats.

The ideal spray distance is 30 cm, the ideal temperature 15 to 20 degrees.

⚠️ Warning

Don’t spray too much at once, otherwise you’ll get runs… In the video, Max shows step by step how to do it right.

4

Clear Coat – Top Coat

After about 30 min. drying time, the clear coat goes over the paint layer.

Shake the clear coat well and apply in 3-5 thin coats, allowing it to flash off after each spray pass.

The clear coat protects the metallic particles from oxidation, gives the paint gloss, and is absolutely necessary as a protective layer.

⚠️ Warning

With solid colors, no clear coat is required. If unsure, email info@dasauto.at or call the hotline (+43 (0) 3687 24515 during business hours).

5

Done?

If you now find small edges, transitions or runs in the paint, that’s no problem:

After 2 to 3 days the clear coat is completely cured and the edge is simply carefully removed with P2000 wet sandpaper and then polished to a high gloss.

Of course, you’ll now polish the entire car and preserve it with hard wax. High gloss and high spirits! Congratulations!

Need supplies?

Shop Now →